| Scheduling Backups > Specify SQL Server > Select Backup Type and Database > Create Backup Schedules > File Settings > Processing and Encryption Settings > Review Summary |
This topic describes the wizard page for specifying the locations and file names for your backups, for managing existing backup files, and for setting the completion options.
Choose:
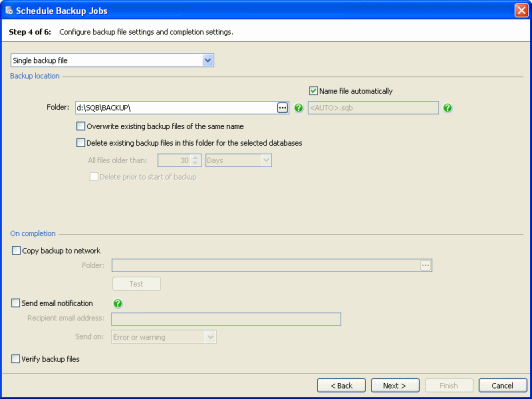
- Single backup file to create each backup as a single file.
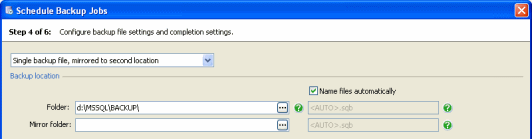
- Single backup file, mirrored to second location to create each backup as a single file and simultaneously make a duplicate of the backup during the backup process.
This is available only if you have selected a single database to back up, and a single backup type. During the backup process, if any of the files cannot be written a warning is raised. However, the backup process continues as long as at least one specified backup file can be written. If none of the files can be written, an error is raised and the backup process is stopped.
- Split backup into multiple files to store each backup across a number of files.
Splitting the backup can speed up the backup process if backing up to a single file does not fully use the Input/Output capacity of your disks. However, note that all backup files must be available when you restore the backup. For a single database backup and single backup type, you can split (or 'stripe') your backup files across a number of disks.
Backup location
For a Single backup file, if you have selected only one database to back up, a default file name is displayed.
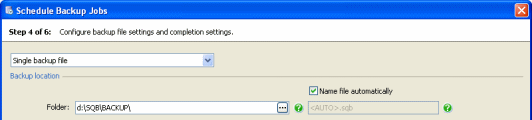
To change the file name, clear the Name file automatically check box, and type the new file name, or click ![]() and specify the file using the file browser. You can use tags in the path and file name, if required.
and specify the file using the file browser. You can use tags in the path and file name, if required.
For information about how to specify file names on remote servers, see Specifying File Paths. Note that if you specify a network share as the backup file location (not recommended), the SQL Backup Agent Service 'log on' user must have Full permissions to access the location; instead, you are recommended to back up locally and use the Copy backup to network option. For more information, see Using SQL Backup to back up to a network share) which is available as a pdf download from the Red Gate Support Web site.
If you have selected multiple databases, multiple backup types, or both, the backup for each database is created in a single file. A default folder for these files is displayed; the file names will be generated automatically. To change the folder, type the new path or click ![]() and specify the folder using the file browser. If you want the backup file to be created in a different folder for each database, in the file browser click Create subfolder for each database.
and specify the folder using the file browser. If you want the backup file to be created in a different folder for each database, in the file browser click Create subfolder for each database.
For a Single backup file, mirrored to second location, specify the backup file as described above, and additionally specify the file in which you want the mirrored backups to be created.
For Split backup into multiple files, if you have selected a single database and a single backup type, you must specify at least two destination files. Type or select each folder and file name as described above, and click Add to add it to the list.
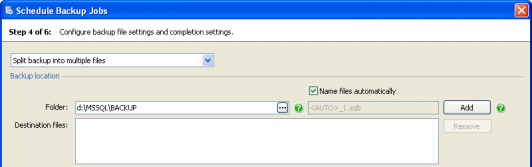
If you have selected multiple databases, multiple backup types, or both, you can specify only one folder for the split backup files; the files will be named automatically.
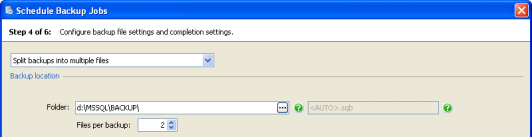
In Files per backup, type or select the number of files into which you want each backup to be split.
File management
SQL Backup provides a number of settings to automate the management of your existing backup files.
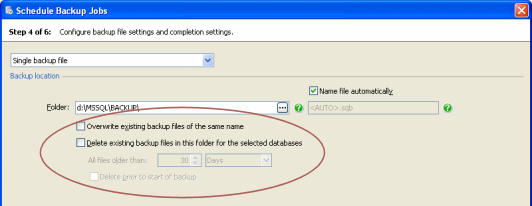
Select the Overwrite existing backup files of the same name check box if you want to overwrite any files that exist with the path name you specified for the backup file or files. Note that if a file of the same name exists already and you have not chosen to overwrite it, the backup will fail.
Select the Delete existing backup files in this folder for the selected databases check box if you want SQL Backup to delete backups of the same type for the selected databases from the destination backup folders. In All files older than, type or select the age (in days or hours) of the files that you want to delete.
By default, the files are deleted when the backup process has completed. If the backup fails, the files are not deleted. To delete the files before the backup is created, select the Delete files prior to start of backup check box. For example, you may want to do this to create space for the new backup files. However, note that if the backup fails, the old files will have been deleted; you are therefore recommended to select this check box only if you have a copy of the existing backups.
On completion
If you want a copy of the backup files to be created on a network share when the backup has completed, select the Copy backup to network check box, and then type the network share details in the box or click ![]() to use the file browser. For information about how to specify file names on remote servers, see Specifying File Paths.
to use the file browser. For information about how to specify file names on remote servers, see Specifying File Paths.
If you typed the network share details, click Test to check that the 'log on' user for the SQL Backup Agent on the source SQL Server has permission to create files on the network share. If it does not have the appropriate permissions, an error message is displayed next to the button; if you choose to keep the network share details, a warning ![]() is displayed in the Activity History when the backup has completed. If you browsed to the network share, this check is performed automatically.
is displayed in the Activity History when the backup has completed. If you browsed to the network share, this check is performed automatically.
For more information about using network shares with SQL Backup, see Using SQL Backup to back up to a network share which is available as a pdf download from the Red Gate Support Web site.
If you want to receive an email with a copy of the completion log, select the Send email notification check box, and enter the recipient's email address. This option is available only if you have entered your email settings. For more information about setting up email notification, see Email Notification Options.
To send the log to multiple email addresses, type each address separated with a semi-colon (;). For example:
dba01@myco.com;dba02@myco.com
By default, email notifications are sent only when there are errors or warnings during the backup process. If you want to receive an email only if an error occurs, select Error only; to always receive an email on completion of the backup process (on success or failure), select Any outcome.
If SQL Backup Lite is installed on the SQL Server, you cannot use email notification.
Select the Verify backup files check box if you want SQL Backup to run a verification of the backup files when they have been created. When the backup process completes, the results of the verification are displayed in the Activity History. They are also saved in the SQL Backup completion log file.
| See Also |
File Location Tags | Scheduling Backup Jobs | Specify SQL Server | Select the Backup Type and Database | Create Backup Schedules | Processing and Encryption Settings | Review Summary
© Red Gate Software Ltd 2008. All Rights Reserved.