When you have selected the tables or rows that you want to include in the synchronization, you use the Synchronization Wizard to create the SQL script that will synchronize the databases.
To open the Synchronization Wizard, click ![]() Synchronization Wizard.
Synchronization Wizard.
Setting the synchronization direction
The Direction page enables you to change the direction in which the synchronization changes will be made.
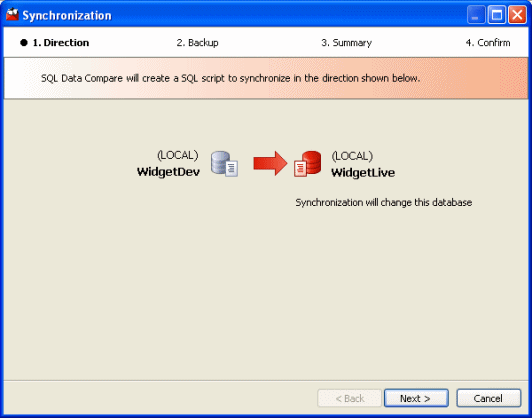
To change the synchronization direction, double-click the arrow.
If the target data source is a backup, the backup will not be modified, but you can generate a synchronization SQL script; note that the generated script does not take into account dependencies or foreign keys, therefore you are not recommended to run the script, if it references multiple tables.
Backing up the target database
The Backup page enables you to create a full backup of the target database before it is updated. If the target data source is a backup, this page is omitted from the Synchronization Wizard.
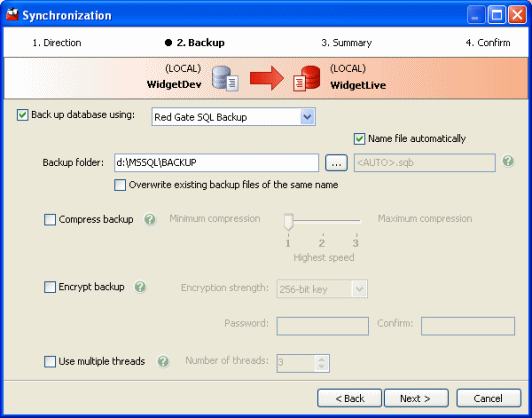
To back up the target database, select the Back up database using check box and choose:
- SQL Server native to create a backup using the native SQL Server BACKUP command
- Red Gate SQL Backup to create a backup using SQL Backup version 4 or later
Note that you must have the SQL Backup server components installed on the SQL Server instance of the target database.
Backup location
For SQL Server native:
- Type the file path in the Backup folder box or click
 to specify the path using the folder browser. By default, Backup folder is set to the default backup folder for the SQL Server instance.
 - Type the file name in the box to the right of the Backup folder box.
For Red Gate SQL Backup:
- Type the file path in the Backup folder box or click
 to specify the path using the folder browser. By default, Backup folder is set to the folder specified in the SQL Backup options for the SQL Server instance. If no backup file locations have been set up, SQL Backup uses the SQL Server instance's default backup folder.
 - Specify the file name in the box to the right of the Backup folder box. By default, the file name is set to <AUTO>.sqb; SQL Backup uses the SQL Backup options to generate the backup file path and file name. If no backup file locations have been set up, SQL Backup uses the SQL Server instance's default format for file names.
To change the file name, clear the Name file automatically check box, and type the required file name. You can use SQL Backup tags, if required. For information about tags, see File Location Tags in the SQL Backup online help.
To specify a network path in the Backup folder box, type the full path, including the server name, for example \\ServerName\MyFolder
Note that the file path is relative to the selected SQL Server. For example, if you have chosen to back up a database on a remote SQL Server instance called ServerA and you specify a local path such as C:\Backups, the backup files will be created on the C: drive on ServerA, not on the local computer.
Select the Overwrite existing backup files of the same name check box if you want to overwrite any files of the same name that exist for the file path you specified in the Backup Folder box. Note that if a file of the same name exists already and you have not chosen to overwrite it, the backup will fail if you are using SQL Backup.
Compressing the backup
If you are using SQL Backup to back up the target database, you can choose from the three compression levels described below. Generally, the smaller the resulting backup file, the slower the backup process.
To compress the backup, select the Compress backup check box and select the compression level by moving the slider.
- Compression level 3
Compression level 3 uses the zlib compression algorithm. This compression level generates the smallest backup files in most cases, but it uses the most CPU cycles and takes the longest to complete.
- Compression level 2
This compression level uses the zlib compression algorithm, and is a variation of compression level 3.
On average, the backup process is 15% to 25% faster than when compression level 3 is used, and 12% to 14% fewer CPU cycles are used. Backup files are usually 4% to 6% larger.
- Compression level 1
This is the default compression level. It is the fastest compression, but results in larger backup files.
On average, the backup process is 10% to 20% faster than when compression level 2 is used, and 20% to 33% fewer CPU cycles are used. Backup files are usually 5% to 9% larger than those produced by compression level 2.
However, if a database contains frequently repeated values, compression level 1 can produce backup files that are smaller than if you used compression level 2 or 3. For example, this may occur for a database that contains the results of Microsoft SQL Profiler trace sessions.
Note that if SQL Backup Lite is installed on the SQL Server, you can choose only compression level 1.
Encrypting the backup
If you are using SQL Backup to back up the target database, you can encrypt the backup by selecting the Encrypt backup check box, then typing a password for the backup in Password, and again in Confirm.
If SQL Backup Pro is installed on the SQL Server, you can choose 128-bit or 256-bit encryption; if SQL Backup Standard is installed on the SQL Server, you can choose only 128-bit encryption; if SQL Backup Lite is installed on the SQL Server, you cannot encrypt the backup.
You must remember your password; if you do not, you will not be able to access the encrypted backup.
Using multiple threads
If you are using SQL Backup to back up the target database and you are using a multi-processor system, using multiple threads can speed up the backup process. Select the Use multiple threads check box and type or select the number of threads up to a maximum of 32. You are recommended to start with one thread fewer than the number of processors. For example, if you are using four processors, start with three threads.
For details of how you can find out the most effective number of threads to use for your setup, see Optimizing Backup Speed in the online help for SQL Backup.
Reviewing the synchronization summary
The Summary page lists the actions and modifications that will be carried out during the synchronization.
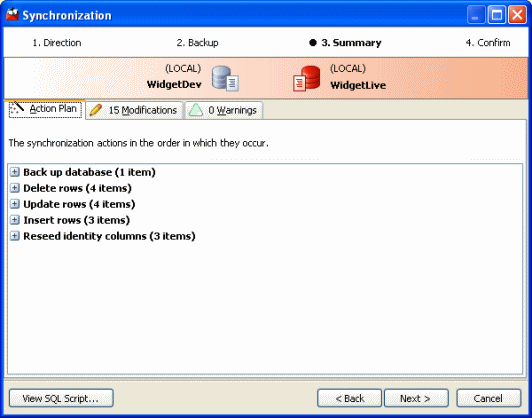
The Summary page displays the following tabs:
- Action Plan provides a synopsis of the script, grouped by command type, in the order in which the commands will run. To view the commands for each command type, click
 . To copy the action plan, right-click and click Copy Action Plan to Clipboard.
 - Modifications provides a synopsis of the script, grouped by table or view. To copy the modifications, right-click and click Copy Modifications to Clipboard.
- Warnings displays any warnings about unexpected behavior that may occur when you synchronize the databases. To copy the warnings, right-click and click Copy Warnings to Clipboard.
To display the synchronization SQL script, click View SQL Script.
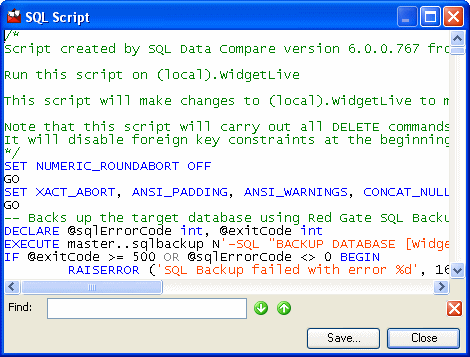
You can:
- search the script
In the Find box, type your search text and click
 or
or  to find the next or previous match. If there are no further matches, the Find box changes color.
 - copy the script details for use in another application
Select the SQL statements, right-click, and then click Copy.
Alternatively, right-click, click Select All, then right-click, and click Copy.
- save the script to open it in a different application, or to keep a record of it
Click Save; a standard Windows® Save As dialog box is displayed.
Running the synchronization
The Confirm page enables you to specify how you want to use the synchronization SQL script.
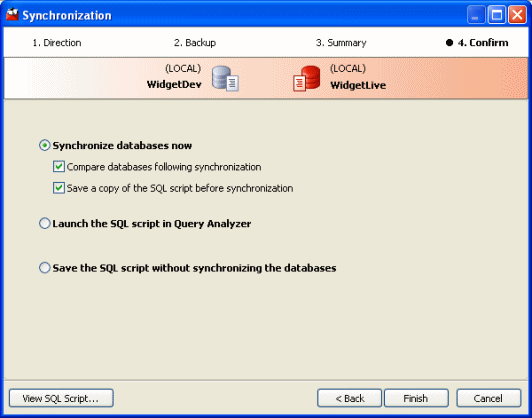
Do one of the following:
- To run the synchronization SQL script from within SQL Data Compare, select Synchronize databases now.
Note that if the target data source is a backup, this option is not available.
- If you want SQL Data Compare to re-compare the databases on completion of the synchronization, select Compare databases following synchronization.
- If you want SQL Data Compare to save the synchronization SQL script before the databases are synchronized, select Save a copy of the SQL script before synchronization.
- To review the script, depending on your Application Options settings, select Launch the SQL script in Query Analyzer or Launch the SQL script in SQL Server Management Studio.
- To save the synchronization SQL script without synchronizing the databases, select Save the SQL script without synchronizing the databases.
You can change the default query editor or the default location where the synchronization SQL script is saved by opening the Tools menu and clicking Application Options; you must close the Synchronization Wizard first.
If you selected Synchronize databases now and SQL Data Compare is unable to synchronize the data, an error dialog box is displayed, and where possible all changes are rolled back. Note that if you have cleared the project option Use transactions in SQL scripts, the changes are not rolled back.
| See Also |
Setting Up the Synchronization | Troubleshooting | Warnings | Setting SQL Data Compare Options
© Red Gate Software Ltd 2008. All Rights Reserved.